Pioneering - Shelters - Sheet

Downloadable Material
![]() A list of downloadable pioneering projects, including camp gadget flashcards
A list of downloadable pioneering projects, including camp gadget flashcards
Introduction
If you have the use of a waterproof sheet (such as a plastic groundsheet or similar) then there are many quick and easy shelter options open to you. The sheet will automatically provide cover from the wind and rain, and will help to insulate your shelter solving your main problems in one fell swoop. You should still remember some key points;
- Make use of natural shelter
- Never lie on the ground directly. Have bedding of some description(groundsheet, grass, leaves).
- Pay attention to wind direction and site accordingly.
- Pay careful attention to drainage. If it rains you don't want to wakeup in the middle of a torrent of water.
- Always have ventilation. A completely enclosed shelter may bewarm, but it is dangerous.
- In the case of sheet shelters, you will probably want to tie or stakedown your edges.
Simple Sheet

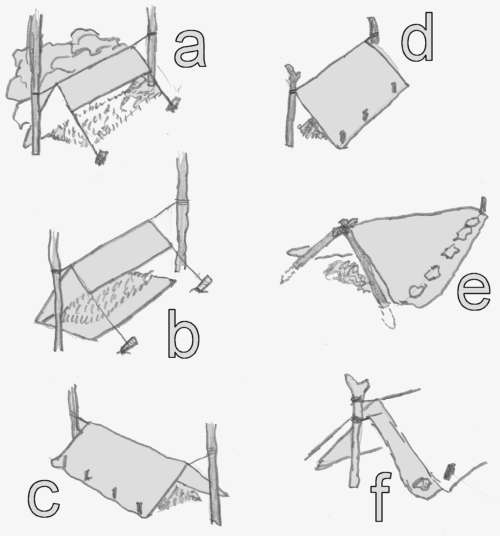
- A simple shelter, useful if your sheet is not very large. Supported by a rope strung between two uprights or A-frames. Note the use of bedding.
- Better if you except pleny of rain. The sheet should run downhill to keep the occupant dry.
- A simple tent-like construction. Peg down the edges to prevent the wind and rain gaining access. Pay careful attention to drainage. If it rains you don't want to wakeup in the middle of a torrent of water.
- Perhaps the simplest of them all. Site to prevent prevailing wind blowing into the shelter. Only sensible to use if sheet size is too small to do anything else with it.
- and f) A nice snug shelter. Site the apex (tapered end) of the triangle into the wind. Note the use of stones to hold down the edges. Only comfortable for sleeping in. A double layer of sheet is preferable in any situation. The reason for this is, as with canvas tents, touching the sheet when it rains may draw water through (not really applicable to most modern plastics, mainly for canvas).
Saplings

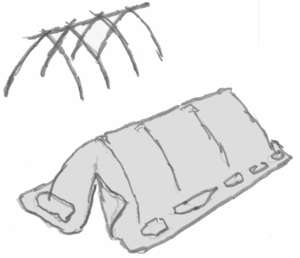
A sapling shelter relies upon finding a suitable area where the woodland is still young. You will need to find at least 4-6 saplings in a small area (it would be easier if they were 'in line' - see diagram). Simply bend the saplings and lash them together. You will find it easier to lash a 'ridge pole' across the top, as in a tent. Simply drape your waterproof sheet over the top. Either stake or weight down the edges to prevent unwanted guests and water entering.
If there are no suitable saplings available you can make a shelter like this by driving pliable branches into the ground.
Teepees

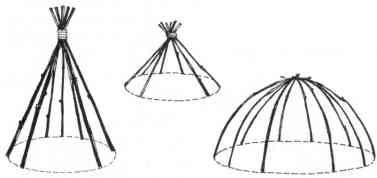
A tepee is an extremely simple shelter to construct and can be very effective. All you need is to lash together several poles much as you would do to form a tripod (using a shear lashing type) or cone. Simply tie them together whilst the poles are laying on the ground and then erect and shape to the desired angle.
A steeper angle will be more effective at keeping the rain out, but a shallower angle will allow more room inside the shelter. Cover the tepee with sheeting or bark panels (covering with vegetation is not a very effective or practical method, and animal hides are difficult to come by!). You may well find that you have to secure the pole at the ground for the shallow angle/wide tepees. Inserting the pole itself into the ground or a simple cross member arrangement will help keep the shape. For the steeper angle tepee the poles should stay upright and secure by themselves.
Remember to leave a slight opening near the top for ventilation, oh and of course a door of some