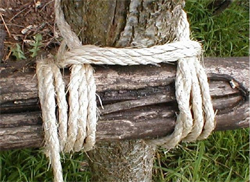
Knots: Lashings - Square Lashing

Permission is granted to copy, distribute and/or modify this document under the terms of the GNU Free Documentation license, Version 1.2 or any later version published by the Free Software Foundation; with no Invariant Sections, no Front-Cover Texts, and no Back-Cover Texts.
Useful Links
Downloadable Guides
Introduction
A Square Lashing is used to hold two poles that cross each other (usually at a 90-degree angle although not necessarily). If the angle of contact is less than 45 degrees a sheer lashing should be used.
It can also be used where the load on one pole may cause it to slip over the other.
It is important to note that there should be no tendency for the poles to slip apart. If the force tends to separate the poles only the rope will be supporting the load.
To make this lashing as tight as possible it is important to tighten each turn as it is made. Frapping turns stabilize the lashing and tighten it further.
When tying a square lashing, the poles and the rope must be positioned properly to achieve the maximum strength. The cross pole should be positioned so that the force applied to the cross pole is directed toward the pole it is lashed to. This allows the contact between the wood to take part of the load.
Step by Step Guide
- Tie a clove hitch.
- The beginning clove hitch should be tied to the pole that is in line with the direction of the force and to the side of the cross pole that is opposite to the direction of the force applied. (For example, in most cases the force applied will be gravity and so the beginning clove hitch should be tied to the vertical pole and under the cross pole.)
- The standing end of the rope (the bit left over so to speak) is secured by wrapping it around the running end (the bit that you use to tie the lashing). This will secure the clove hitch so that it will not slip around the pole and loosen the lashing from the inside.
- Note: This is not always done. If you leave this step out ensure that when you do step 3 the clove hitch slips to one side and is securely held by the 'pull' of the rope in the turns. Alternatively it is recommended that you leave a 'long end' on the clove hitch to be used in the last step.
- Wind the rope alternately behind then in front of the next two sections of the pole.
- Pull on the rope to tighten it around the poles.
- Take the rope over the lower part of the vertical pole and then under the next section of the horizontal pole to complete the first lashing turn. Pull the rope tight.
- Complete two or three more turns to make a total of three or four turns altogether.
- Note: When the turns are taken around the vertical pole they should be inside the previous turns. The ones around the cross pole should be on the outside of the previous turns. This makes sure that the turns remain parallel and hence the maximum contact between the rope and wood is maintained.
- Tighten the lashing with a frapping turn by bringing the rope down over the front of the horizontal pole and behind the lower vertical pole. Pull the frapping turn tight.
- Note: Try to make sure that the frapping turn does not begin by crossing the wrapping turns diagonally. Go around the cross pole (as if you were going to do a half-hitch) and then into the frapping turns. Otherwise the increased friction will make it harder to pull the wrapping turns tight and if not tied correctly the diagonal across the wrapping turns will allow the rope to move unnecessarily.
- Make about three full frapping turns around the poles.
- When you have finished the frapping make a half hitch around the cross pole. Tuck it under itself and pull it tight. Tie a second half hitch to form a Clove Hitch.
- Note: This step should be done carefully so that no tension is lost in the lashing and so that the clove hitch can not slip around the pole allowing the lashing to loosen. If you need to trim any excess rope and tuck the long end under the lashing.
- Once the final Clove Hitch is tied be sure to leave a 'long end'.
- Now tie a secure Reef Knot with the ends of the starting and finishing Clove Hitches. This should lie tightly across the lashing and should ensure that neither Clove Hitch works loose